 Photinerary
Shot Planner
Line up a photograph before you go: where to stand, which lens, and the moment the sun, moon or Milky Way is in frame.
Start a shot
In the Shot Planner tab, tap New Shot and choose:
- Choose a Location… to plan from one of your saved places. The photographer pin starts there.
- Quick Shot (No Location) to plan anywhere without saving a place first.
- AI Shot Planner… to describe the shot in a sentence; see below.
You can also tap Plan a Shot on any location's page.
Place yourself and your subject
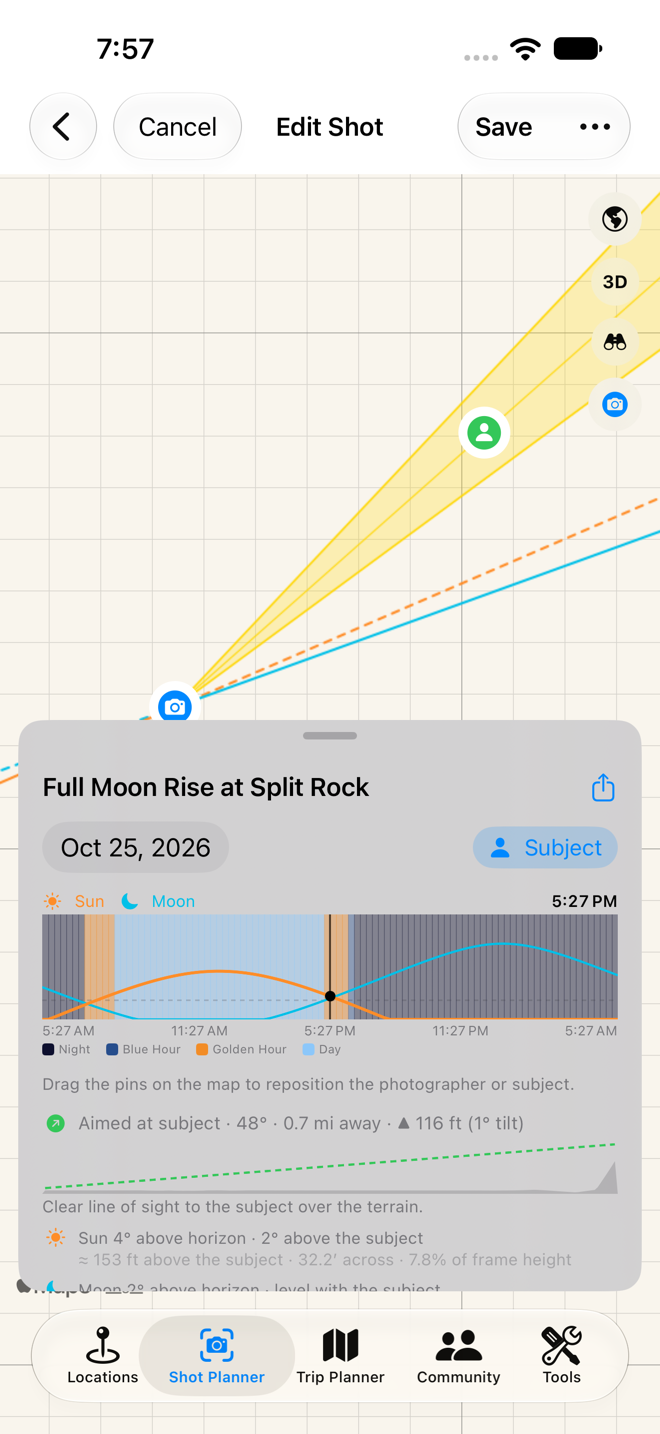
- Drag the blue photographer pin to where you'll stand. Pins move on first touch; there's no need to select them first.
- Turn on Subject and drag the second pin onto what you're photographing: a lighthouse, a peak, a tree. The camera now points at it automatically.
- Without a subject, set the bearing by hand with the bearing control.
When both pins settle, Photinerary looks up the ground height at each and shows the difference, the distance, and how far to tilt the camera up or down. That's what tells you whether a moon at 3° will clear a lighthouse on a cliff, or sit behind it.
Use Center on Photographer (the camera button on the map) to bring your pin back into view, and the map/satellite button to change the map style.
Choose your camera and lens
- Pick your sensor: full frame, APS-C, Micro Four Thirds, 1-inch, medium format, or Custom… with a width and height in millimetres.
- Set the focal length: tap a quick focal length, type one, or scrub the lens bar. You can edit the quick list in Quick Focal Lengths.
- Choose landscape or portrait orientation.
The field of view is drawn on the map as a cone, and its width and height in degrees are shown. It updates as you change any of these.
Set the date and time
Choose the Planned Date, then scrub the timeline along the bottom of the panel. The sun, moon and Milky Way lines on the map move as you scrub, and the times of sunrise, sunset, golden and blue hour, moonrise and moonset are marked on the timeline. A tide curve appears on it for coastal places.
The direction lines
Turn each line on or off with its button: Sun, Moon, Milky Way (the galactic core), and a meteor shower's radiant if you choose one. Each line points from you toward that body at the selected time. When a line passes through your field-of-view cone, that body is in frame.
Lines fade when the body is below the horizon, and also when it's hidden behind terrain from where you stand; see terrain. Tap About direction lines for a reminder of what each style means.
Two options in Settings change how lines look: Show opposite direction and Extend camera line behind you.
Find Alignment
Instead of scrubbing day by day, let Photinerary search for when the sun, moon or Milky Way lines up behind your subject.
- Set a subject (Find Alignment needs one), then tap Find Alignment….
- Under Bodies, choose what to look for, and under Time of Day, when (for example only around sunrise or sunset).
- Set the Search Range in days ahead, the bearing tolerance (how far either side of the subject still counts), and the altitude above the horizon you want, as a minimum and maximum.
- Tap Search. Each result shows the date and time, the altitude, how far off the bearing it is, and for the moon its phase.
- Tap a result to set the shot to that moment.
Tip: for a moon "on" a lighthouse, start with an altitude of 0° to 5° and a tolerance of ±1°, then widen the tolerance if nothing turns up. Use Search From Today to start again from today after moving the range.
AI Shot Planner
- Tap New Shot › AI Shot Planner….
- Under Describe the Shot, write something like "full moon rising behind Split Rock Lighthouse next month" or "golden hour at Half Dome this Saturday".
- Under Confirm the Place, check the place it found in map data, and pick another if it's wrong.
- Review the draft shot and tap Save, or adjust it first.
Notes, reminders and sharing
The ··· menu on a shot has:
- Notes & Photos: notes and reference photos for this shot.
- Exposure…: the Exposure tool with this shot's lens and the light likely at the planned moment, and an Add to Shot Notes button at the top. See Exposure.
- Remind Me, Extra Time to Walk In and Countdown on Lock Screen; see Reminders.
- Add to Calendar.
- Collaborate… PRO to plan it with friends, and Share to Activity… PRO; see Community.
The share button (Share Summary) sends the plan as text: place, time, lens and what lines up.
Saved shots with a planned date within five days show their sky reading PRO for that moment.
Going further
The Shot Planner also knows the terrain: when the sun really clears a ridge, whether the subject is visible at all, a 3D map, and a first-person view through your lens. That has its own page: Terrain, 3D and View from Here.